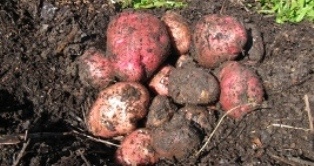
No Dig Potatoes
No Dig Potatoes are my favourite so far, the flavour, colour and texture beat any crop I have grown in the ground. They really seem to flourish being grown this way.
Another plus is that hilling them up is a heck of a lot easier than soil grown, you just keep on piling on the Mulch and they keep growing more potatoes. This is Organics made easy.
No Dig Gardening is catching on as it is a simple easy effective way to grow crops, particularly in difficult soil conditions. Here in Australia’s Northern Queensland, we aren’t blessed with a very good soil, it is quite heavy and slow draining especially in our famous tropical downpours!
I use this system for most of my Gardening now, the results speak for themselves with an abundant Worm population, healthy plants with huge root systems because they are being grown in a pretty much perfect environment.
Each year you use No Dig Gardening the original soil improves, the Organic Matter increases as the Mulch being used on top breaks down. There will be Worms in numbers you have never seen in your Garden before, a sure sign that the soil conditions are right.
Another benefit of Growing this way is that the crop is elevated above the normal ground level so waterlogging isn’t an issue any more. This helps keep the Fungal incidents down minimising the need to use any sprays.
Below are a series of photo’s that show step by step how the process of No-Dig Potatoes unfolds.
Step 1;
Spread a Layer of Skim Milk Powder (an excellent Vegetable Fertiliser and Fungicide) along with Rock Dust or Blood and Bone (if Rock Dust isn’t available) on the ground. You can use any Organic Fertiliser as long as it has a high Phosphorus and Potash content, avoid too much Nitrogen as this will force the Potatoes to grow just top and no Potatoes. Straight onto grass is fine as the grass will die and add Organic Matter as a matter of course.
Step 2;
Lay either newspaper or cardboard on the ground with a hole every 25 to 30 cms depending on the variety that you are growing. In each hole you place your seed potato, this lets the potato absorb the Skim Milk and other Fertiliser you have applied.
Step 3;
Cover the seed potato with about 20 cms of Mulch. Here I have used a partially decomposed leaf litter, ensure the Mulch you use is black, this indicates that the heating process of Composting has past and there is no fear of cooking your Potatoes before you dig them up! We have a mulcher to process all our tree and shrub prunings, a great way to make use of what would normally be dumped. Add another dressing of Skim Milk Powder and water in well.
Step 4;
Add more Mulch as the Potatoes grow to keep only the last 100 mm of plant showing at any time, this will give you a great crop of healthy tasty Potatoes, if you are getting a lot of rain and Blight may become an issue add more Skim Milk Powder, it is an excellent Natural Fungicide.
Harvest after flowering, you can pick the larger potatoes first by just digging the Mulch away to expose the potatoes and pick the biggest putting the mulch back when you have finished, this lets the later setting Potatoes get to a good size before harvesting them.
When you have dug your spuds you can follow up with another crop straight away, just add more Skim Milk Powder and way you go.
Be Happy,
Barry.

Latest comments
I want to fertilise my desert roses, what brand fertiliser do I use?😊
For long term residual control use regular liquid fish fertiliser as a foliar spray, another method if your plant is an ornamental is a soil drench with Neem Oil. Cheers, Barry
Christina, I find the best preventative is regular liquid fish fertilizer or if your plant is an ornamental a soil drench with Neem Oil is a great long term residual method. Cheers, Barry
Hi Christina, There are two ways of getting rid of the carcasses, wipe them off with either a damp cloth or paper towel or just wash them off with your garden hose. Cheers Barry